About BMW Thorn
Meet Wes
A.K.A. BMW Thorn
I'm a Midwestern artist, steelworker and Navy veteran whose creative journey is deeply rooted in a life of hard work, mechanical curiosity, and a love for craftsmanship. Born in 1969 on the West Coast to a Navy family, I moved to Indiana after my father’s wartime service ended. My youth was spent building model airplanes, flying kites, fishing, skateboarding, and riding BMX bikes—always working with my hands and exploring how things moved, worked, and fit together.
At 18, I enlisted in the Navy, where my fascination with all things mechanical fully took hold. Stationed primarily in San Francisco and later San Diego, I served six years aboard two ships, completed multiple deployments, and married my high school sweetheart, Debra. In 1993, after completing my service, I returned to Indiana and began a decades-long career in the steel industry as a welder, ironworker, mechanic, and fabricator.
Though I’ve spent most of my life in trades, I came to art relatively recently. A visit to the modern art wing of the Art Institute of Chicago—where I stood transfixed by two Mondrian paintings—sparked something unexpected. Inspired by the emotional power of abstraction and the work of artists like Rothko, Stella, Hilma af Klint, Kandinsky, and O’Keeffe, I began experimenting with acrylic on wood, using contrasting colors, texture, and form to explore emotional resonance. What began as a spontaneous creative burst has since evolved into a disciplined, expressive practice.
I create out of my home studio in Portage, Indiana, where I live with Debra and our three hound dogs—Charlie, Oscar, and Molly. Now an empty-nester with two grown sons and a grandson, I continue to explore the intersection of craftsmanship and fine art. Whether tinkering on something in the workshop, reading, or cycling, I bring the same curiosity and grit to my creative life that I always have to my work.
My paintings reflect both my industrial background and a quiet reverence for color, balance, and emotion. My work invites viewers to feel something—sometimes bold, sometimes subtle—but always honest.

The Artist's Process
Let me address the first question I usually get. Yes those are all individual, hand painted pieces of wood.
It begins with a sheet of 1/4 inch birch plywood. If I’m planning a 24 x 24 inch painting it begins with a plain piece of 24 x 24. I smooth the edges and surface with sandpaper. Mainly for safety at that point. I don’t like to catch sharp splinters in my hands. It’s not pleasant. After this initial sanding the work begins in earnest.


Step 1.
Drawing the form.
I simply draw on the plywood with a pencil until the form is exactly how I envision it. At this time I also prepare the back panel which everything will eventually get glued to. I make the back panel exactly 3/4 of an inch smaller on both dimensions so when it’s put together, the painted pieces overlap the back panel by 3/8 of an inch on all 4 sides.

Step 4.
Gesso.
Once every piece is sanded and is perfectly smooth, they get acrylic gesso. It serves to seal the top surface of the wood so the colored paint cannot soak in, but gives it an ideal surface to adhere to. Typically all pieces get two to three coats, applied with a small foam roller.
Step 7.
Hiding the edges.
I apply either black ink or black paint to the edge of the back board to improve the look of the edges of the painting. I used to leave it plain, but now I want the painting to look good on every single surface, edges included.

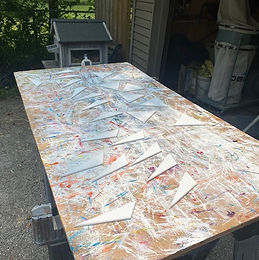
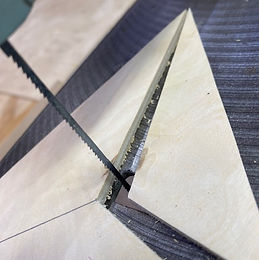
Step 2.
Cutting out the form.
Cutting out the form. I use an old Delta 16” scroll saw that a good friend of mine gave me nearly 15 years ago. My friend passed away last winter so every time I use the saw I remember him and honor our friendship. Cutting out the shapes is a tricky business because there’s almost no room for error. If I make a mistake, I have to fabricate a new piece to replace the bad piece.
Step 5.
Color.
Before the application of color, decisions have to be made. This is generally when I decide which colors I want and their placement in the painting. Once the decisions are made I can start applying color. All pieces are individually hand painted, again, with a cheap foam roller. I typically let everything dry for 2-3 hours before I decide which pieces need extra coats. For some reason, green is the color that most commonly needs 2nd and 3rd coats. Once every piece is painted and inspected, I can try a test fit.

Step 8.
Final Gluing.
Gluing the pieces down is next. I usually work from the top left to the bottom right. Sometimes, with larger pieces, it’s better to start in the center and work out towards the edges. The important thing is to keep everything aligned correctly and leave no or minimal gaps. Small gaps can be tolerated and hidden by applying black ink on the back board under the gap. I’ve found it’s hardly noticeable when I have to do that. I don’t glue everything down at once. I work slowly and carefully. I’ve ruined paintings by being careless at this step. It’s easy to get in a hurry when the finish line is in sight. I apply an area of approximately 12-15 square inches and then protect it with wax paper and bubble wrap before I apply weight. The weight holds the pieces completely flat while the glue hardens.

Step 3.
Sanding.
Every single piece gets a radius on the top corners. I do this by hand with a sanding block. This step is by far the most laborious and time consuming part of the process. On my bigger pieces, it’s not uncommon for me to be sanding for ten days or more.

Step 6.
Test fitting.
This is the first really fun part because I finally get to see what the painting will look like finished. I usually take photos so I can consider final color changes if any are needed. This is also where I make sure I have 3/8 of an inch overlap over the back board. If it needs trimmed, I do that now.

Step 9.
Finishing.
I apply black ink to the underside of the pieces near the edges so no natural wood color is visible on the edges. Maybe nobody looks at the edges of paintings, but I do and I want everything to be as clean looking as possible. After this, the painting is finished.

Let's Get in Touch
Want to commission a piece, include my work in an exhibit, or learn more about me as an artist? Contact me!